I created a simple project called CAT (Code Assistant Tool) to learn how Continue.dev works.
Note: This project currently only implements the basic messaging architecture and infrastructure. The actual code assistant functionality has not yet been implemented. The focus is on establishing the communication framework between components.
- Background
- Introduction to Continue.dev
- Implementation Process of Cat
- Conclusion
- Project Repository
- In the end
Background
With the development of large language models, the field of code assistant tools has grown rapidly. These tools mainly come in two types: IDE-based (like Cursor, Windsurf) and plugin-based (like Github Copilot, Cline, RooCode, and Continue.dev).
Continue.dev is a unique plugin because it supports not only VS Code but also JetBrains IDEs. This is possible thanks to its message-passing architecture. Understanding how it works is fascinating, so I created a simple project called CAT (Code Assistant Tool) to learn its approach.
Introduction to Continue.dev
Continue.dev is an open-source AI coding assistant that integrates into popular IDEs like VS Code and JetBrains. What makes it unique is its architecture - it uses a message-passing system that allows it to use the same core functionality across different IDE platforms.
Key features of Continue.dev include:
- Cross-IDE support: Works with both VS Code and JetBrains IDEs
- Extensible architecture: Modular design with clear separation of concerns
- Message-passing system: Components communicate through well-defined protocols
- Open source: Uses Apache 2.0 license, allowing community contributions and customization
Continue.dev’s architecture consists of three main components:
- The core service that handles business logic
- The GUI that provides the user interface
- The IDE extensions that integrate the core and GUI into the development environment
Architecture
llm/streamChat Message Passing Process
Implementation Process of Cat
First, implement each major component
Core
The Core component is the central processing unit of the CAT project. It’s a TypeScript Node.js application responsible for handling message passing between the IDE and other components.
Implementation
The Core component is a simple TypeScript class that:
- Handles messages from the IDE through a messaging interface
- Sends responses back to the IDE
- Processes basic commands like ping/pong
- Provides a clean API interface for extensions
The main components of the Core include:
- Core Class: The main service class that handles message processing
- Protocol Definitions: Defines message types and interfaces for communication
- Messenger Interface: Implements communication mechanism between Core and IDE
- IDE Interface: Defines interfaces for interacting with the IDE
Key Files
core/src/core.ts: Main Core class implementationcore/src/protocol/index.ts: Protocol definitions for message passingcore/src/protocol/messenger.ts: Message passing interface implementationcore/src/ide/index.ts: IDE interface definitions
How It Works
The Core service works by registering message handlers for different message types. When a message is received from the IDE, the Core processes it and sends a response. The basic flow is:
- IDE sends a message to the Core via the messenger
- Core processes the message based on its type
- Core sends a response back to the IDE
- IDE handles the response
Here’s a simple example of how the Core handles a ping message:
// Handle ping message
this.messenger.on('ping', ({ data }) => {
  console.log(`Received ping: ${data}`);
  return `pong: ${data}`;
});
Graphical User Interface (GUI)
The GUI component is a React application that provides a user interface for interacting with the Core service. It’s designed to work with both VS Code and IntelliJ plugins.
Implementation
The GUI is a React application with the following features:
- Uses Redux for state management
- Communicates with the Core service through the IDE extension
- Provides a simple interface for sending messages and displaying responses
- Adapts to different IDE environments (VS Code and JetBrains)
Key Files
gui/src/App.tsx: Main React componentgui/src/redux/: Redux store and reducersgui/src/context/IdeMessenger.ts: Communication interface with the IDEgui/src/hooks/useIdeMessengerRequest.ts: Custom hook for making requests
How It Works
The GUI communicates with the Core service through the message-passing architecture:
- GUI sends a request to the IDE extension using IdeMessenger
- IDE extension forwards the request to the Core service
- Core processes the request and sends a response
- IDE extension forwards the response to the GUI
- GUI updates its state and displays the response
The communication flow can be visualized as:
GUI (React) <-> IdeMessenger <-> IDE Extension <-> Core Component
Running the GUI
For production build:
npm run build
To run the GUI in development mode:
cd gui
npm install
npm run dev
VS Code Extension
The VS Code extension integrates the Core service and GUI into Visual Studio Code, providing a seamless experience for users.
Implementation
The VS Code extension is a TypeScript extension that:
- Hosts the GUI in a webview panel
- Implements the IDE interface for the Core service
- Provides commands for interacting with the Core service
- Handles message passing between the GUI and Core
Key Files
extensions/vscode/src/extension.ts: Extension entry pointextensions/vscode/src/webview/WebviewPanel.ts: Webview panel implementationextensions/vscode/src/views/CatWebviewViewProvider.ts: Webview provider
How It Works
The VS Code extension works by:
- Activating when a command is executed
- Creating an instance of the Core service
- Hosting the GUI in a webview panel
- Handling message passing between the GUI and Core
- Providing VS Code-specific functionality
Running the Extension
To run the extension in development mode:
- Open the project in VS Code
- Run the “Run Extension” launch configuration
- A new VS Code window will open with the extension loaded
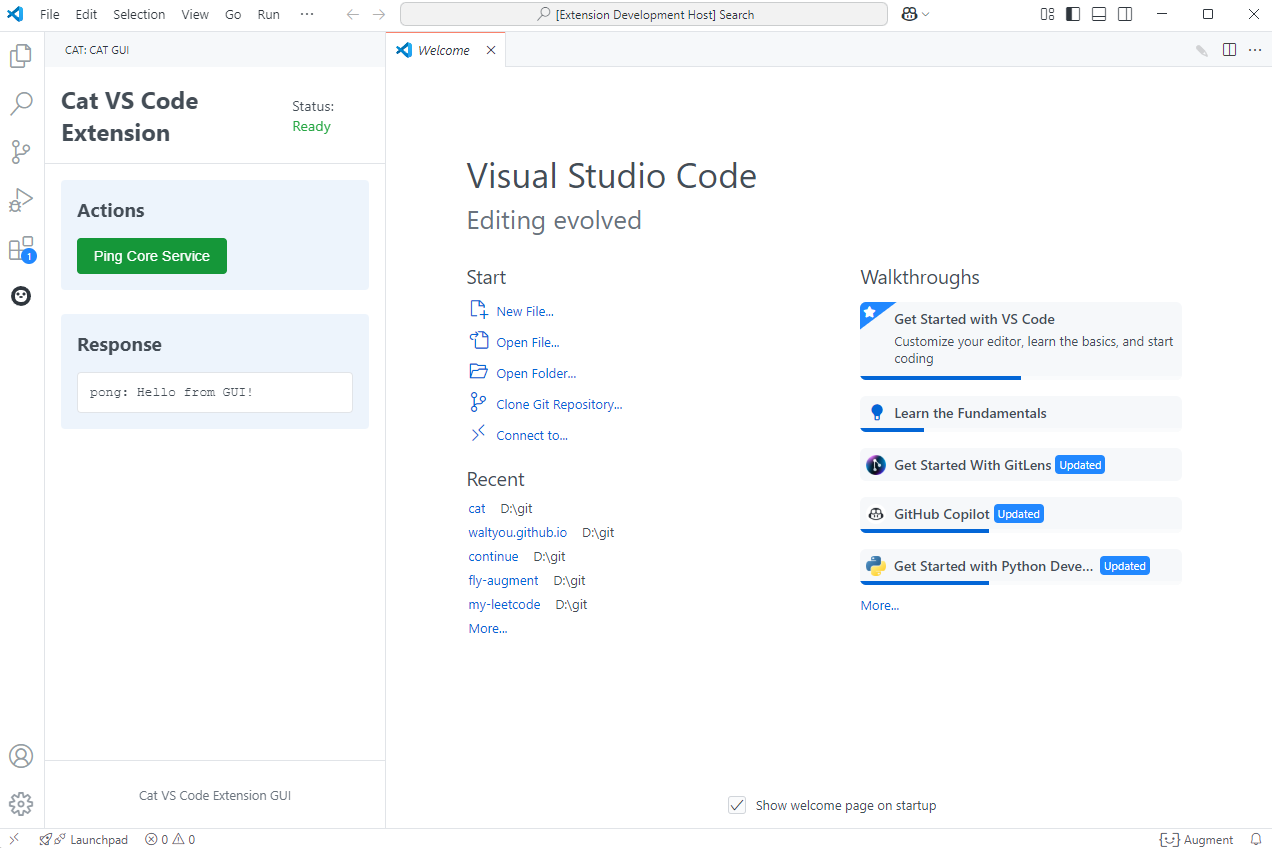
Example
Binary Component
The Binary component provides a standalone executable version of the Core service, allowing it to be used outside of the IDE.
Why It’s Needed
The Binary component is needed for:
- Running the Core service as a standalone process
- Supporting the IntelliJ plugin with the same Core logic
- Providing better performance in production environments
- Enabling easier debugging during development
Implementation
The Binary component is a Node.js application that:
- Creates a messenger (TCP or IPC) for communication
- Initializes the Core service with the messenger
- Handles process lifecycle events
- Provides environment variable configuration
Key Files
binary/src/index.ts: Main entry pointbinary/src/IpcMessenger.ts: IPC messenger implementationbinary/src/TcpMessenger.ts: TCP messenger implementation
How It Works
The Binary component works in two modes:
- TCP mode: Runs as a TCP server, used for development and debugging
- IPC mode: Uses Node.js IPC for production environments
Environment variables control the behavior:
CAT_CORE_DEBUG: Enables TCP mode for debuggingCAT_CORE_SERVER: Runs as a TCP serverCAT_CORE_PORT: TCP port to use (default: 9876)
Running the Binary Component
To run the Binary component in development mode:
cd binary
npm install
npm run dev
For production build:
npm run build
IntelliJ Extension
The IntelliJ extension integrates the Core service and GUI into JetBrains IDEs, providing the same functionality as the VS Code extension but in a different environment.
Implementation
The IntelliJ extension is a Kotlin plugin that:
- Hosts the GUI in a browser component
- Implements the IDE interface for the Core service
- Provides tool windows and actions for interacting with the Core
- Handles message passing between the GUI and Core
Key Files
extensions/intellij/src/main/kotlin/com/cat/intellij/ide/IntelliJIDE.kt: IDE implementationextensions/intellij/src/main/kotlin/com/cat/intellij/toolwindow/CatToolWindowFactory.kt: Tool window factoryextensions/intellij/src/main/kotlin/com/cat/intellij/service/CatPluginService.kt: Plugin service
How It Works
The IntelliJ extension works by:
- Creating a tool window with a browser component
- Loading the GUI into the browser component
- Handling JavaScript calls from the GUI
- Communicating with the Core service
- Providing IntelliJ-specific functionality
Running the Extension
To run the extension in development mode:
- Run
Core Binaryin VS Code - Run
Debug Guiin VS Code - Open the project in IntelliJ IDEA
- Run the Gradle task
runIde - A new IntelliJ window with the plugin loaded will open
Example

Conclusion
Building the CAT project was a great learning experience for understanding how Continue.dev works. The message-passing architecture provides a clear separation of concerns and allows the same core functionality to be used across different IDE platforms.
Key takeaways from this project:
- Modular design: Separating the Core, GUI, and IDE extensions makes the code more maintainable
- Protocol-based communication: Well-defined protocols make it easier to add new features
- Cross-IDE support: The same core logic can be used in different IDEs
- Development experience: Modern tools like React, Redux, and TypeScript improve the development experience
This project demonstrates how to build a simple yet powerful code assistant tool that can work across different development environments.
Project Repository
https://github.com/waltyou/cat
In the end
Almost 95% code are generated by Augment Code.